Lip Syncing in Adobe Animate cc
This lab was written using with use of Adobe Animate 21.01.1
Part i: Visemes and Phonemes
When it comes to lip syncing, the first thing to get set up (apart from the actual character) is the visemes, or the shapes of the mouth. There are many different sources that specify anywhere between 12 and 17 different visemes to set up so that you get realistic and smooth mouth motion.
Some of these sources include:
Some of these sources include:
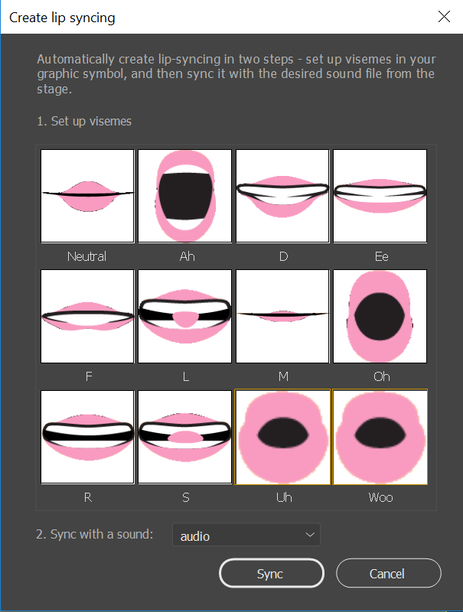
For lip syncing in Adobe Animate, they require these 12 visemes to be available for selection for their Auto Lip Syncing AI.
- Neutral
- Ah - “car”, “adapt”
- DD - “tip” “doll”
- EE - “weed”
- F - “fat” “vat”
- L - “lady” “knot”
- M - “put” “bat” mat”
- Oh- “oh” “toe”
- R - “red” “error”
- S - “sizzle” “zeal”
- Uh - “Unreal Engine 4™”
- Woo- “book” “oopsies”
part ii: setting up your visemes
The main way to set up your visemes is through the frame picker functionality of Animate. The main workflow for this is as follows:
- Create a layer with your neutral mouth
- If it is not a symbol yet, convert this neutral into a symbol.
- Now, you will be able to double click on the neutral mouth to open up an embedded layer within the mouth.
- From here, you can create 11+ keyframes in that embedded layer where you will add each of the different visemes
- To ensure that this worked properly, you go back out to the main workspace, and after clicking on the mouth, see if Object >Frame Picker allows you to choose any of the 12 visemes.
Part iii: Auto Lip Syncing
Now that you have your mouth shapes all set up, the next thing to do is to make sure you have your audio ready. Some things to note:
- Animate would prefer that your audio is in .wav form. It will not take .mp3, cause that would be too convenient for their userbase, right?
- The .wav can be imported into your library just like any other image or symbol, and can be dragged onto an empty layer
- Once the sound is on a layer, you will need to do two things:
- Click on the sound layer and under Frame > Sound > Sync, change it to "Stream." This way it will play along with your time slider and not over top of everything.
- Extend the layer to cover the length of the sound file. With the Stream setting on, this is will make it easy for you to cut the audio off early if needed.
From here, all you need to do, is go back to the mouth layer, and under Properties > Object, right below the Frame Picker, there is a Lip Syncing button. Clicking it will bring up the menu below. All you need to do now is designate which mouth shape you want for each of the 12 visemes, and designate which audio layer you want to sync to. The AI will do the rest.
Part IV: Manual Lip Syncing
You may have noticed that either your auto lip sync looks great, or like absolute trash. This is mainly due to factors such as the visemes not meshing well with each other, or the audio not being voiced in a perfect English accent. At this point, it would be more prudent to lip sync it manually.
You might need more that just the base 12 visemes to do what you really want to do with your mouth, and you may find yourself mouthing these sounds out yourself (mirror highly recommended!). But as long as you keep at it, it will probably look better than what the AI can do.
Keep in mind that:
You might need more that just the base 12 visemes to do what you really want to do with your mouth, and you may find yourself mouthing these sounds out yourself (mirror highly recommended!). But as long as you keep at it, it will probably look better than what the AI can do.
Keep in mind that:
- You can also have tweens from one viseme to the next
- Usually with things like going from a Woo to an Ah (Wah!), there may be a frame in between to transition between those two mouth shapes.
- Overcrowding the timeline with too many mouth-shapes and trying to hit every single sound can make the animation feel worse
- Consider how the speaker might blur some syllables or speak too fast to really hit each of the visemes.
Part V: Your Assignment
We will be providing you with a set of >> AUDIO CLIPS << for which you will need to lip sync.
You will be expected to:
You can submit the lab HERE
You will be expected to:
- Choose one of the audio clips to work with
- Draw a simple character. It does not need to be fully animated for this assignment
- Doing so may make the animation feel fuller, so you can animate it if you want.
- Does not need to be a full body. Just shoulders up, or even just the head is fine.
- Draw the 12 visemes needed for the auto lip syncing functionality
- Provide videos of both the Auto Lip Synced, and manually lip synced animations.
You can submit the lab HERE


