introduction to ADOBE ANIMATE
Note: This lab was constructed with Adobe Animate CC version 21.0.1 as reference.
Table of Contents:
- Getting Started
- Part 1: Animating... in Animate
- Part 2: Drawing in Animate
- Part 3: Not Drawing in Animate
- Part 4: Your Actual Assignment
- Part 5: Exporting Your Animation
getting started
Whether you're part of the advanced course or not, welcome to Animate CC! As with many programs of this ilk, there exists a learning curve to just being able to understand how to properly use Animate, and how to use it effectively enough to fit your own individual needs as an artist/animator. This lab is designed to help guide you through that beginning process and point out useful sections of the program to help you grow accustomed to Animate.
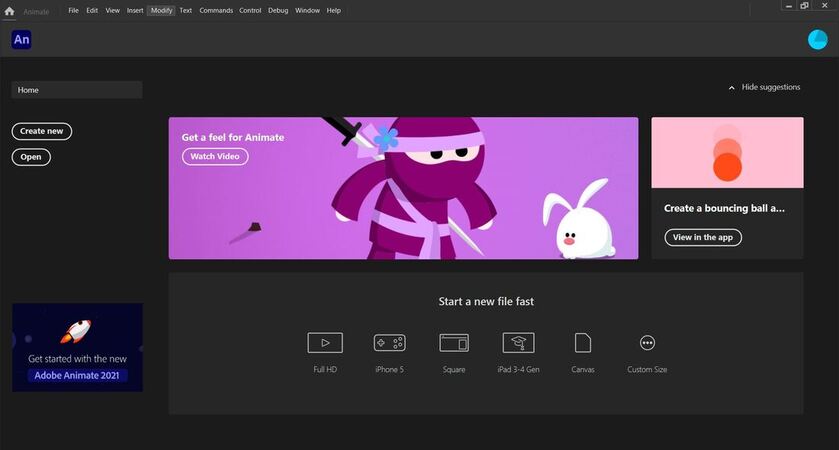
Upon opening up Animate, you may be greeted with a window that looks like this:
There may be an extra window on first-launch showing you tutorials and guides-- go through those as you wish.
Upon opening up Animate, you may be greeted with a window that looks like this:
There may be an extra window on first-launch showing you tutorials and guides-- go through those as you wish.
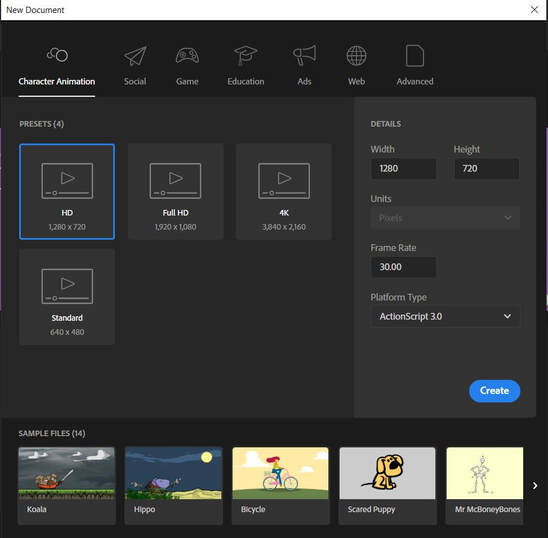
First thing we want to do is click on "Create New," to which we get this window:
- For the scope of this class, we will be sticking to "Character Animation"
- We will likely use a resolution of Full HD
- Otherwise, keep the settings as 30 FPS, and "ActionScript 3.0"
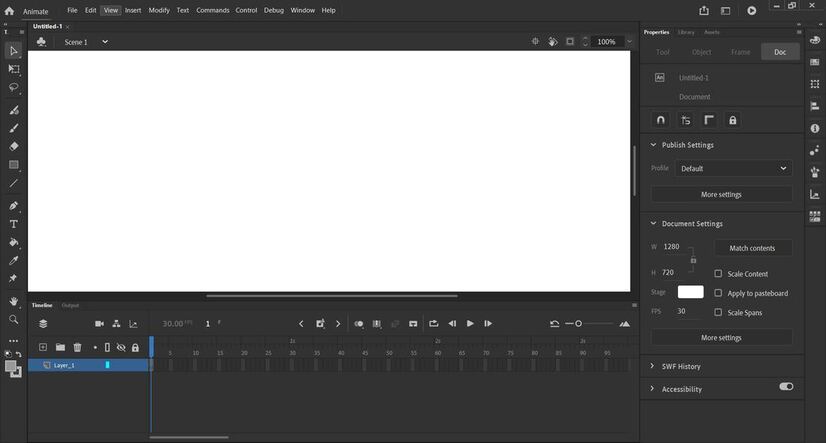
We now greet the most intimidating sight of trying out a new program: a Blank Document. There are a lot of things to take in here. Way too many menus, way too many tools...
But that's why this lab is here! The first thing I would suggest is to go to
WINDOW > WORKSPACES > ESSENTIALS
We get a slightly modified UI from the base, but the small amount of extra bits can help the animating process a lot.
But that's why this lab is here! The first thing I would suggest is to go to
WINDOW > WORKSPACES > ESSENTIALS
We get a slightly modified UI from the base, but the small amount of extra bits can help the animating process a lot.
Of course, we have the main tools on the toolbar, but it should be noted that some of the tools (Brushes, Free Transform, Fill tool) don't work the same way they do in programs such as Photoshop and Clip Studio Paint. We will go over these as we go through these in lecture as to not pad out this lab too much.
Be sure to go through Edit > Keyboard Shortcuts to change shortcuts to match your tablet settings (if applicable).
Be sure to go through Edit > Keyboard Shortcuts to change shortcuts to match your tablet settings (if applicable).
part i: ANimating... in Animate
You will notice that, like other drawing programs, Animate has layers! However, they are built similar to Photoshop's video groups and can be a little finnicky to wrap your head around. Upon creating a new layer, it will create a long dark-grey bar on the timeline to the right. As soon as you draw something, the bar will fill up to a lighter-grey, indicating that that layer now has something on it.
We now have some useful shortcuts:
We now have some useful shortcuts:
- "," and "." to move one frame to the left/right
- F5 -- Adds one frame of exposure to the selected keyframe
- Shift + F5 -- Remove one frame of exposure to the selected keyframe
- Can entirely delete a keyframe
- F6 -- Convert the currently selected frame to a keyframe
- If the keyframe is already filled, will create the keyframe while keeping what’s already on it and beyond.
- Note: This will happen automatically if you draw on a tween frame
- F7 -- Add Blank Keyframe
- Creates the keyframe and deletes any drawings on the frames beyond the selected keyframe.
On the timeline, we have some very useful tools to make the animating process easier:
- In Yellow: Visibility and Lock Layer
- In Green: Onion Skinning -- This will add a range onto your player bar(the blue thing that shows what frame you are on). It shows you colored afterimages of the frames before and after, depending on how you set the range.
- While seeing multiple frames at the same time, you will only edit the one that is being selected.
- In Red: Edit Multiple Frames: This will make it so that you can draw/erase on all the frames in the range. This will show afterimages of the frames, but won't recolor them as onion skins will.
- WARNING: For both Onion Skins and Edit Multiple Frames, you can right click on the icons, and select "All frames." If you do this for a lengthy animation, it could very well crash your program due to how many image it has to load. So be very careful about using that option.
- In Blue: Loop animation: This similarly sets a range on your player bar that allows you to select which frames you want to loop when you play your animation. This is very useful for seeing if a certain section moves in the way you want it to.
part 2: Drawing in Animate
Now we move onto actually drawing on your blank canvas! You might notice as you take your first brush strokes that the way Animate calculates brush strokes is much different from other programs, leaving a shadow before actually placing the entire line. This is something you will need to get used to if you plan to draw directly on Animate. These individual strokes are "remembered" by Animate and can be utilized by the transform tool to change certain line specifically.
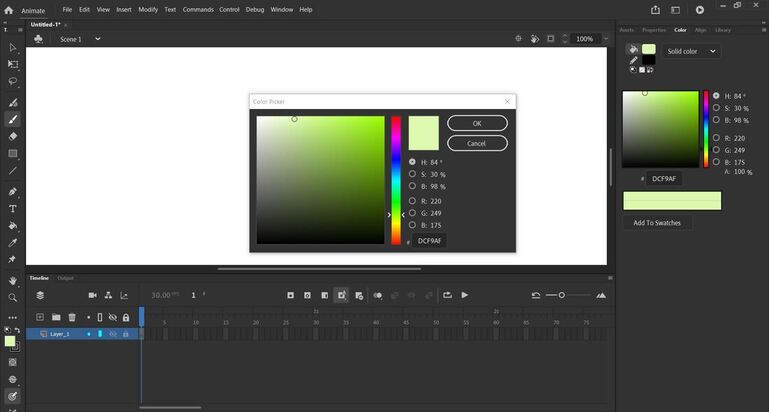
Another thing to notice is that, at first, the color picker is different from other programs. To change to a more typical color picker, change the selection option to "H" -- for hue (As seen above).
You will notice that on the bottom left, the sub color box is hollow. This is because rather than having a "sub color," They have a "Fill Color" and a "Stroke Color." Certain tools and brushes will use either the stroke color or the fill color, which for brushes, you can usually change on the right side under "Tool."
Note: Brushes that use the Stroke Color, such as the Paint Brush tool, create instanced shapes to approximate an actual brush stroke. (Demonstrated in the lecture recording). Because of this, the eraser cannot necessarily erase the stroke, but only each individual instance. This can be changed by toggling the "Draw as Fill" option.
This little guy is the Free Transform tool. He could be your best friend, or your worst enemy. Here are some things to note about the free transform tool:
- As noted above, since brush strokes are remembered as individual shapes, the tool can click on these individual shapes and edit those specifically.
- It can also be used to click-and-drag rectangular areas, which you'd think would select all the shapes in that range, but NO! When doing this it will select only the material in that rectangular area, and edit it as expected.
- When you have a selection, depending on where you click, you can...
- Move
- Rotate
- Skew
- So be sure to watch how the icon changes before clicking.
part 3:NOT Drawing in Animate
So let's say you're like a few of the facilitators on AFA, and you have a distaste for Adobe products. Or maybe you're used to other drawing programs and you'd prefer to not have to learn to draw with this software's different processing of brush strokes. There is a solution!
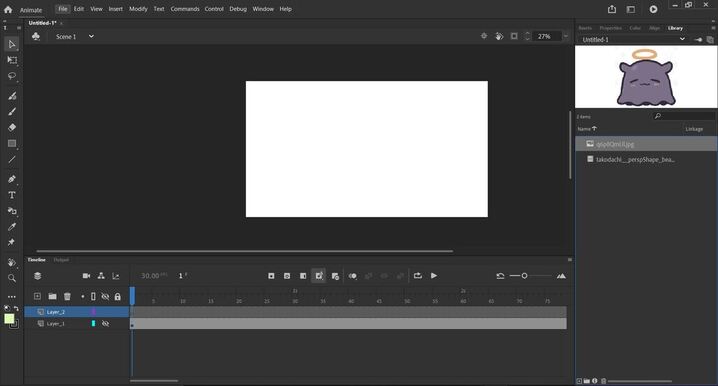
Introducing, the Library
Introducing, the Library
The Library on Animate is able to take in image files, which you can place directly into your timeline. It's as easy as drag and drop into the Library, and you're all set.
So if you choose to draw on another program, you just have to export each individual frame with a transparent background (typically as a .png) and import them into Animate. While that might sound like a lot of work and hassle, if it means that you are more comfortable with the art, then it may be worth the workaround to try this method instead.
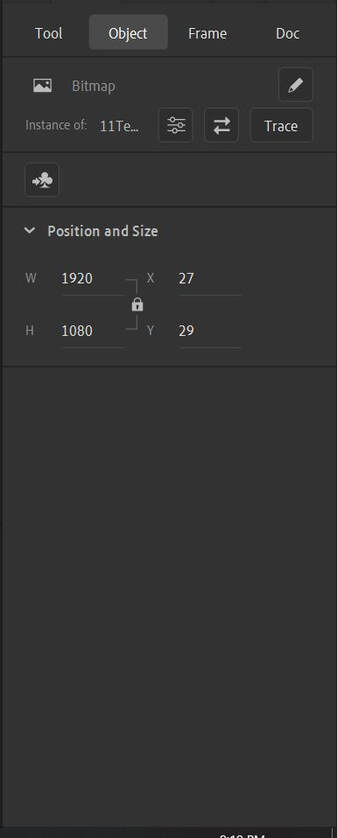
IMPORTANT NOTE: When importing lineart to Animate, they will be placed on your timeline, not as lines, but as actual images. This means that you will not be able to erase any lines native to the imported image until you do the following:
Select the image with the pointer tool or free transform tool, then on the right side, go to:
Properties > Object > Trace
This will turn the image file into workable paint that you can erase as you see fit.
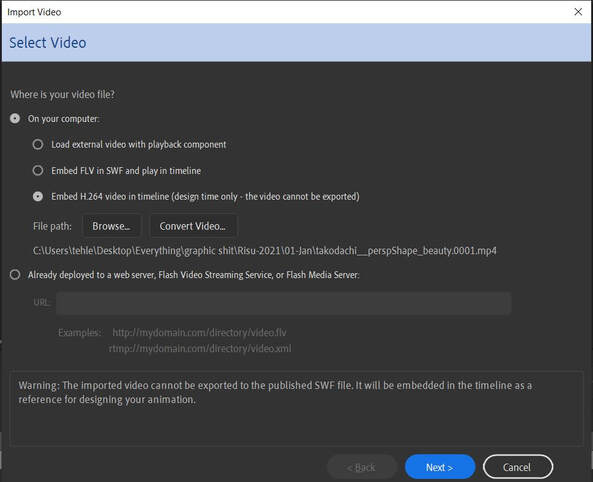
To import a video/animation, you go to:
File > Import > Import Video
And that brings up the menu below. The selected option will directly place the video into your timeline and play as per usual.
File > Import > Import Video
And that brings up the menu below. The selected option will directly place the video into your timeline and play as per usual.
Part 4: Your Actual Assignment
Because this lab is mainly to help you get acclimated to Animate, we will make your work very simple and just be:
A BOUNCING BALL (crazy right?)
Try to use solely Animate to draw the frames, and experiment with the parameters of the tool.
If it proves too unwieldy, then you are free to try and draw the frames on another program and import them to Animate
A BOUNCING BALL (crazy right?)
Try to use solely Animate to draw the frames, and experiment with the parameters of the tool.
If it proves too unwieldy, then you are free to try and draw the frames on another program and import them to Animate
Part 5: Exporting your Animation
You have multiple options when it comes to exporting your animation. But for the sake of brevity, most of your clips will be exported through:
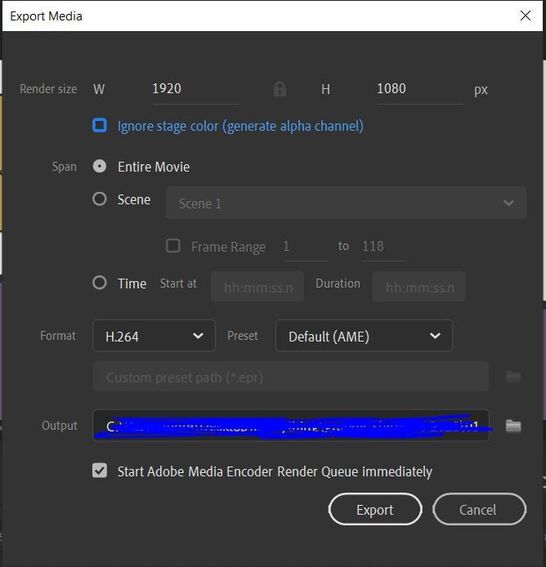
File > Export > Export Video/Media...
Which brings up this menu.
File > Export > Export Video/Media...
Which brings up this menu.
Unless you're looking to only render out a small section, the settings are good as is, and will export as an H.264 aka .mp4 file. Do note that this will open up Adobe Media Encoder, which should have installed along with Animate if you did so through Adobe Creative Cloud.
And that's it! Be sure to include your ball animation in your homework submission, and if there are any other questions that weren't answered in this introduction, feel free to ask the facilitators any questions (Or if you prefer, you can always ask Google Sensei).
